Friday, October 24, 2014

Bear Hugs using a Sassy Cheryl digi stamp

Hi Crafty Friends,

Thought I'd share a card I made a few days ago for a kiddo who was having surgery.


The image is called "Bunny gets a home" and you can find it here. Couldn't be cuter don't you think? Cheryl's designs are all super cute and she has several different characters all of which have their own sassy personalities. Hop on over and meet them all here.

I tried to keep the card pretty simple, which is oh so hard for me. The image is colored with a combination of Spectrum Noir colored pencils and Crayola colored pencils. Then I used Gamsol to blend everything out. Watching the Gamsol dissolve the wax and blend the colors is fun and I'm still practicing and learning. This is only my second time using Gamsol and I like it a lot.

The papers are "Dear Lizzy: Polka Dot Party" by American Crafts and the sentiment is actually from a Pure Innocence stamps set from MFT called "Bear Hugs". I stamped and embossed the sentiment and cut it into that fish-tail banner shape and popped up the center with some foam tape while glueing the ends down flat. I thought it added just a bit of dimension.


The tabs on the top and bottom of the image are cut using a die from the Spellbinder "Address Book" die set. This satisfied the part of me that wanted just a touch of fancy while still keeping it pretty simple. As the final touch I added some enamel dots and some sparkle with a clear Wink of Stella brush pen.


So there she is. All ready to go and hopefully ease the nerves and send some virtual hugs to a nervous young lady.


Hope you enjoyed.

Thanks so very much for stopping by. Have a blessed & crafty day!

Hugs~Bettina :)

Supplies:

Inks: VersaFine Black Onyx
Colored Pencils: Spectrum Noir & Crayola
Papers: Dear Lizzy: Polka Dot Party by American Crafts; Recollections 110lb white cardstock
Embossing Powder: Recollections detail black
Image: SassyCheryl "Bunny Gets a Home"

Miscellaneous: Wink of Stella clear brush pen; Recollections enamel dots; 
Adhesives: ATG; Scotch 3D foam tape; Tombo Monomulti glue

Monday, October 20, 2014

Paisley has a Prezzie Birthday card

Hi again,

So, here are pictures of the finished card and I'm super happy with how it turned out. Tadah!!!


The color inspiration for the stamp came from Pinterest. I gave my Spectrum Noir markers a good workout on this one. lol. The papers are from MME "Happy Day" 6x6 paper pad and they go just perfectly with the colored image. I used some Amercan Craft trim to frame the image. 


I used Bellariffic Friday Sketch # 20 (from Oct 10) as the layout for this card and it really suits the image because it's long and narrow. The sentiment is from a Lawn Fawn stamp set and I embossed it with some black embossing powder. I decided to stamp it on patterned paper rather than white cardstock and I think it looks rather sweet.


For some finishing touches I added some sequins (I wish I had used some restraint with them-lol) and my new Wink of Stella brush pen, which I absolutely LOVE. Are you seeing all that sparkle?!


That is the card. Hope you enjoyed. Oh, before I forget, here's the video on how I made the card. The video almost got scrapped because my nose kept getting in the frame, but I decided to suck up my pride and post it anyway. ;)


Sure glad you stopped by. Have a blessed & crafty day.

Hugs~Bettina :)


Supplies:

Stamp: Stamping Bella "Paisley has a Prezzie"; Lawn Fawn "Happy Everything"; Stampendous birthday greeting (inside of card-not shown)

Inks: Memento Tuxedo Black, VersaFine Onyx Black
Spectrum Noirs: hair: GB8, EB3, EB5, GB9; skin: FS2, FS3, TN2, TN3; dress top: GB1, GB3, OR2; dress skirt: TB1, TB2, IB2, BT4, BT5, BT8; present, stockings, bows, shoes: PP3, PP2, PP6, DR1, DR5, CR6; ruffles only: PP3
Papers: MME "Happy Day" 6x6
Embossing powder: Recollections detail black
Embellishments: clear Wink of Stella brush; misc. sequins; American Craft trim
Adhesives: ATG, Scotch 3M foam tape

Friday, October 17, 2014

Card Sneak Peak

Hi there,

Here's a sneak peak of a card I just finished. If all went well, I might even have a process video to go with it. (crossing fingers)


Thanks for stopping by & please check back again soon for pics (& maybe a video) of the finished card.

Have a blessed and crafty day.

Hugs,
Bettina :)


Wednesday, October 8, 2014

Shabby Vintage Pennant

Hello crafty friends,

Time for another post. My plans to enter lots of challenges have been foiled (by life--lol) but I managed one more timely entry. Yay! It's for Tina Cappa's 500+ subbie challenge on YouTube. You can click here to get all the lovely details. Her challenge ends on the 15th of October so there's a little bit of time if you'd like to join.

UPDATE: Tina has extended the deadline for her challenge until the end of October, so YAY! Lots of time to join in!

Here's my entry:

It's a pennant!!! Never made one before let alone in the style Tina requested: shabby or shabby vintage. Whether or not I succeeded with the style I'm really happy with how it turned out. While I struggled with a lot of decisions about which embellishments to use, I knew for sure I wanted to use the lace. I also thought this Gorjuss Girl image would work well. I paper-pieced her dress and colored her in with Spectrum Noir markers. Then I used a Label Eight die from Spellbinders and used some distress ink around the edges. Well, it turned out to be a little bit too large for the pennant so I decided to frame the image using a pre-cut frame (came in a pkg with a bunch of different sizes by Recollections); the shape was similar to the Label Eight but smaller and I liked the dimension. I painted it off-white (because it was brown), and cut the image to fit. 

The pennant is a piece of 6.5" x 7.5" chipboard that I covered in lovely papers from the DCWV The Primrose stack. That stack has beautiful papers in soft blues, soft blacks, pale greens, & pinks with lots of florals & birds and it just feels very vintage. I layered a pink print on top of a music sheet print and cut the pink print paper slightly smaller. I roughed up all the edges of all the papers and made some tears in the pink print so that some of the music print could show through. The back is covered with a soft blue printed paper from the same stack. Before I placed the first layer of paper down, I placed some black self-adhesive lace on a roll to frame out the shape. You can just see it peeking out.


Next I placed the framed image somewhat centered and glued the lace, pearl trim, and rose trim in place.

The flowers are all by Recollections. The layered flowers come in a mixed package where some of the flowers have print and some are plain. I layered them and used brads to hold them together and hot glued them in place. Then I surrounded them with pink & blue roses (also from Recollections). I also added some random gems from my stash and created a couple of bows.


To get the ends of the bows to curl, I actually wrapped them around a metal crochet hook and zapped it with my heat tool; kind of like a mini curling iron. I love the effect of the curls.


Finally, I decided to add a removable charm dangle that I made with some beads and chain from my stash. (I love all sorts of crafts so I have lots of different kinds of material). I think it adds a sweet touch, don't you? And as a bonus, she can remove it and put it on anything she wants. Love the butterfly!


I used my crop-a-dile to punch two holes and add eyelets. I didn't have white ones in the right size, so I used the blue-ish ones I had instead. It still works although I'm thinking of painting them white?....


So, that's my entry for Tina Cappa's challenge. Hope you go check out Tina's channel and I hope you enjoyed my project and maybe got inspired to make something. I really enjoyed making this sweet pennant.

Thanks for stopping by.

Have a blessed & crafty day.

Hugs~Bettina :)

Supplies:

Stamp: Gorjuss Girl-"You brought me Love"

Inks: Memento Tuxedo Black, Tim Holtz distress ink: Peacock Feathers
Spectrum Noirs: hair: EB3, EB5, EB8, IG10; face & skin: TN2, FS3, FS2, CR3; dress top ruffle: CR3, PP2, PP6; dress slip: BG1, BG2, blender
Papers: DCWV The Primrose Stack; chipboard (1/8")
Dies: Spellbinders Nestabilities Label Eight
Embellishments: Recollections Lace on a roll; Recollections floral embellishments & roses; Recollections pearl brads; Celebrate It Nylon ribbon-white; miscellaneous lace, pearl trim & gem stones; miscellaneous beads (probably Bead Landing), chains & findings

Thursday, September 25, 2014

Thankful & Grateful

Hi,

Just finished my entry for the Unity Stamp Company monthly "be inspired" challenge. There's still time so if you'd like to join in click the link:


Here's the inspiration for this month's challenge:


Here's my entry: 


It's so sparkly! I'm pretty happy with how it came out and I love the stamp; it's the SOTW (Stamp of the Week) stamp from last week, I believe. It's called Thankful & Grateful Oak. It's soooo pretty!!!


I stamped the tree on some pretty paper (from BoBunny) cut into a square and embossed it with some copper embossing powder and layered it on gold glitter paper (DCWV Naturals paper pad; 12x12) and dark red. The sketch showed a sort of semi circle shape in the background so I drew one out on the back of the gold glitter paper and cut it out to fit on the background paper from BoBunny Autumn Song collection. I stamped the sentiment that came with the SOTW and embossed that in copper as well. 


The inspiration picture showed some zig zag lines so I decided to try using my sewing machine and stitched around the layered mats using variagated colored thread and a zig zag stitch. For the focal image I decided to leave the thread loosely hanging off the corner but I cut it off on the sentiment. 

I distressed the edges of all the papers with Tim Holtz Vintage Photo distress ink. Then I used my Cricut and using the Straight from the Nest cartridge found leaves that I cut at about 1" out of olive green cardstock. I distressed all the leaves with Tim Holtz Vintage Photo, Fired Brick, & Spiced Marmelade and randomly placed them along the curve of the gold glitter paper. The focal image, the sentiment and a few random leaves are on foam 
dimensionals.


That's my fall card and my entry. Hope you like it.

Thanks for stopping by.

Have a blessed and crafty day. 

Hugs~Bettina :) 


Supplies:

Stamp: Thankful & Grateful Oak by Unity Stamp Company
Inks: VersaMark, Tim Holtz: Vintage Photo, Fired Brick, Spiced Marmelade
Papers: dark red cardstock; olive green cardstock; DCWV Naturals 12x12 paper stack; BoBunny 6x6 Autumn Song Collection
Embossing powder: copper
Misc supplies: ATG gun; Scott 3M foam tape; Tombo monomulti glue; variagated thread

Tuesday, September 23, 2014

Paisley Has a Prezzie card

Hi again,

Bonus post & a video!!! Yay!

For this post I wanted to share the actual card I entered in Jamie's (Scrappin Stampers) monthly challenge (I talked about it in the previous post). It came out so cute.


The challenge was to make a fall or back to school card or project. The card was inspired by AmyR who is Prairie Paper & Ink on YouTube. She made these awesome cards on Kraft cardstock using white embossing or white stamping and coloring with colored pencils. I love that look and wanted to try it out for myself.  The stamp I used is Uptown girl Paisley has a Prezzie, by Stamping Bella, and her actual image shows her holding a present behind her back. Well, I wanted her to hold a pumpkin to really make it more fall themed.


I used my new Spectrum Noir colored pencils to color her in and then I used my Cricut Create a Critter cartridge (p. 70) to cut out the pumpkin from orange cardstock; it's cut at 0.75". To add details to the pumpkin I used a VersaMarker pen; it's like the pen version of the VersaMark sticky ink pad. With that pen I drew on the lines and used white embossing powder. For some shading I used Spectrum Noir alcohol markers and for even more detail I used a white gel pen.


For the "bow" I wanted to do something a little different. I found some orange organza ribbon in my stash and played with it by folding the ribbon back & forth on itself and fanning it out. When I liked how it looked I stapled it and hot-glued it behind the image like you see here.


Finally, I embossed the sentiment with a copper embossing powder and used the Wink of Stella pen (not the brush) to add some sparkle to the pumpkin and all the purple areas on the stamped image.


So, that is the card for today. I will post more soon since I'm working on more challenge entries.

I did promise a video so here it is. Hope you enjoy!


Talk to you again soon. Thanks for stopping by!

Have a blessed & crafty day!

Hugs~Bettina :)

Supplies used:
Stamps used: "Uptown Girl Paisley has a Prezzie" from Stamping Bella, "Greetings" by TPC Studio.
Spectrum Noir Markers: OR1, OR2, GB3
Spectrum Noir Colored Pencils (Essentials Set): 001, 039, 095
Inks: Versa Mark; Versa Marker;Tim Holtz Distress Inks: Vintage Photo; 
Gel Excel Reminisce white gel pen
Embossing Powder: Recollections Black Fine Detail, Recollections Detail Embossing Powder: Snow; copper embossing powder (probably Recollections)
Cricut Cartridge: Create a Critter (p. 70) for the pumpkin
Papers: Kraft cardstock from SSS card kit; BoBunny Autumn Song collection (6x6 paper pad)

Embellishments: orange organza ribbon from Michaels
Adhesives: Foam dots, Tombo Mono-Multi Glue, ATG tape, hot glue

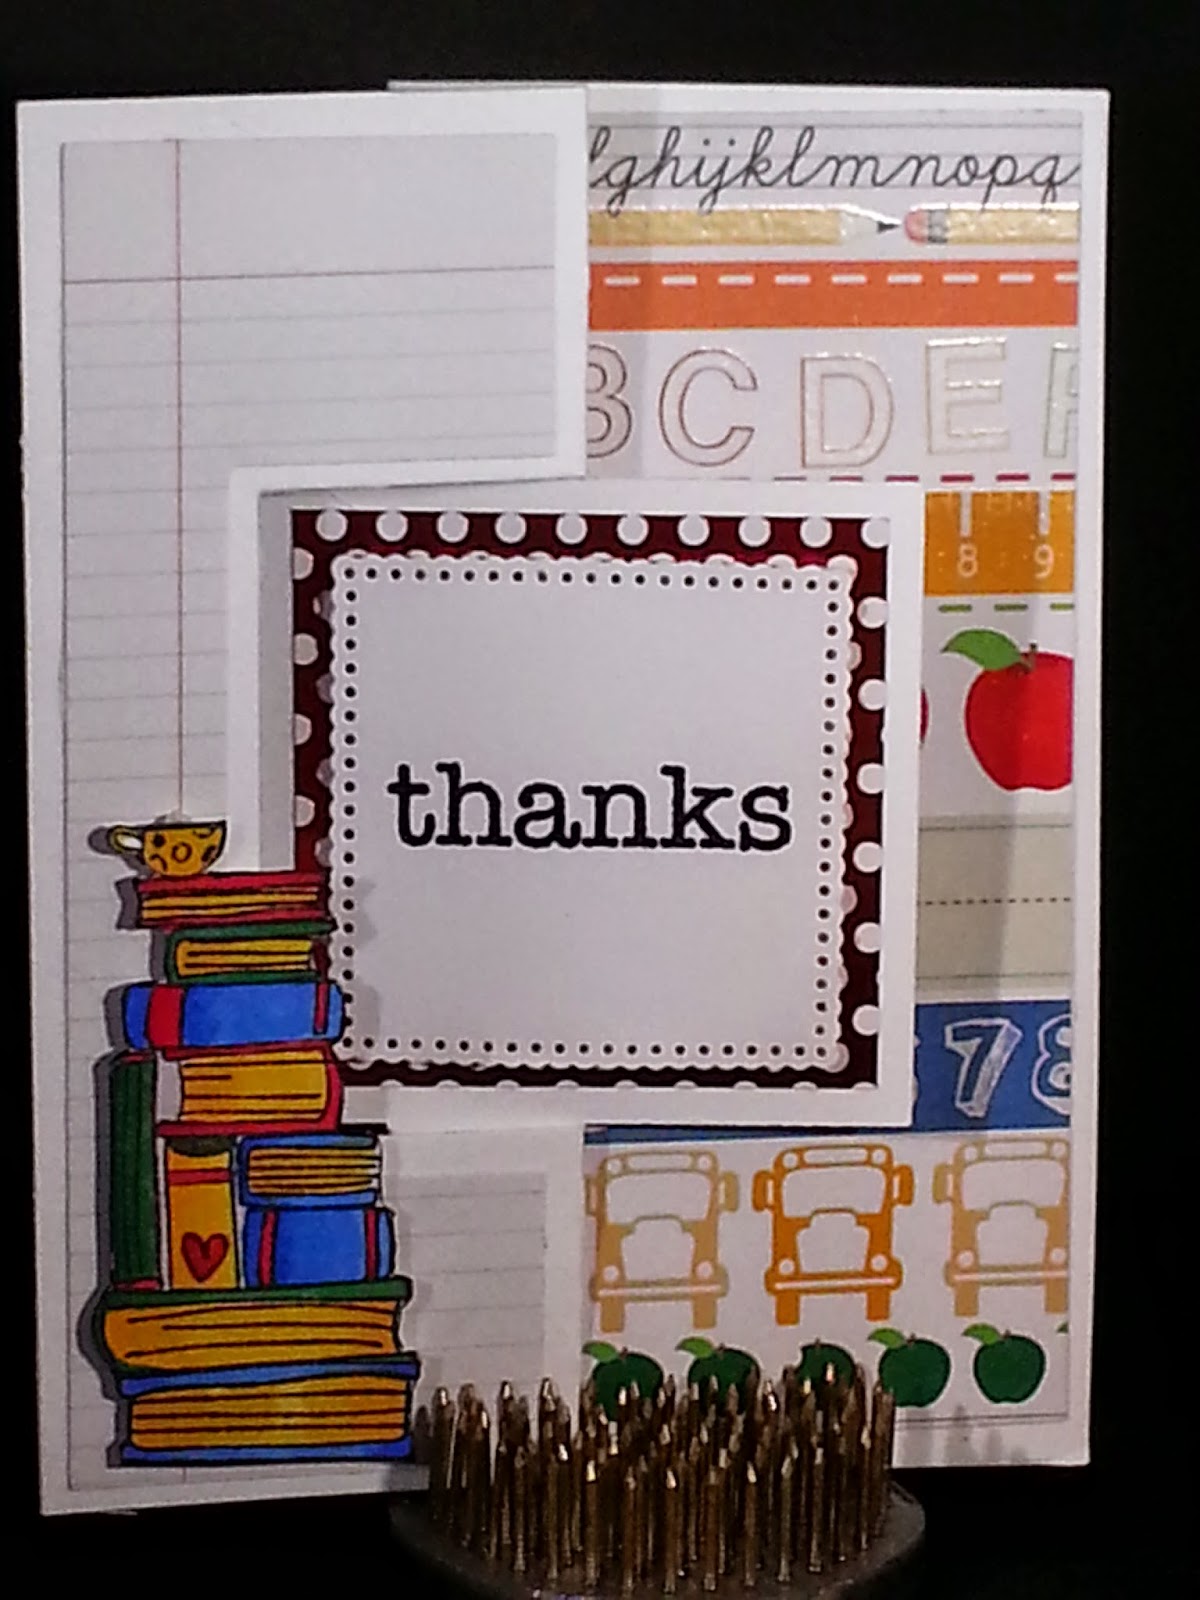
Teacher Thank You card

Hi there,

I had wanted to have a crafty weekend but had so many mishaps that I was only able to make 2 cards. I still need to make 3 or 4 cards & other projects because I plan to enter several challenges going on (more on that in later posts, I think)

So here's one of the cards I made.


It's a flip card I made using my new Sizzix Square Flip-Its die set. In no time at all with this set of 12 dies you can make this type of card with all the layers. So fun!!! It's hard to see, but I actually embossed the sentiment; I feel like it stands out just a bit more that way. Next time I will try to use a lighter weight paper because I used a 110 lb paper here and find that it's hard to stay closed. Since it's my first time making this type of card and using this die set I'm not sure if it's supposed to be that way? 


The papers are by Mambi. The stack of books is actually a stamp by Unity Stamp Company and I colored it with Spectrum Noir alcohol markers, fussy cut it, and stuck it on with some foam tape.


I had intended to use it as an entry for Jamie at Scrappin Stampers. She has a monthly challenge on her Facebook page. However, I changed my mind and will just keep this card on hand. Never hurts to have a teacher thank you card handy, right?!  I will share my actual entry card to Jamie's challenge in another post instead. :)

I'll be back in a bit with more posts and a video tutorial.

Thanks for stopping by.

Have a blessed & crafty day!

Hugs~Bettina :)

Supplies used: 

Dies: Sizzix Cards-Square Flip-its #2 (559175)

Stamp: Itty Bitty by Unity: Struggle is Part of It; TPC Studio (sorry, not sure of the name of this stamp set. Had to throw out the packaging because it was a mess) but the set has several versions of "Thank You" and some speech bubble stamps. Hope that helps :) 

Inks: Memento Tuxedo Black Ink; VersaFine Black Onyx

Papers: Recollections 110 lb white cardstock; Mambi Sheets 8x8 school pad

Embossing powder: Recollections Detail Black

Scott 3M foam tape, ATG gun

Spectrum Noir: TB4, TB5, JG1, JG4, GB3, GB4, DR3, DR6 

Inkadinkadoo embossing buddy